Facebook Custom Audience
Sync Fanplayr 360 Audiences with Facebook
.DTlLUFsg.png)
Facebook Custom Audiences can only be used as a destination when syncing Audiences.
INFO
![]() Are you using Firefox? If you have Containers enabled for Facebook then connecting your account will not work. Simply disable Containers for Facebook while connecting to Fanplayr. You can enable it once it has been connected.
Are you using Firefox? If you have Containers enabled for Facebook then connecting your account will not work. Simply disable Containers for Facebook while connecting to Fanplayr. You can enable it once it has been connected.
Authentication
Fanplayr 360 connects with your Facebook account using a secure OAuth2 connection.
Upon clicking the "Initialize connection" button in the Destination editor, you will be see a popup that asks for a few items.
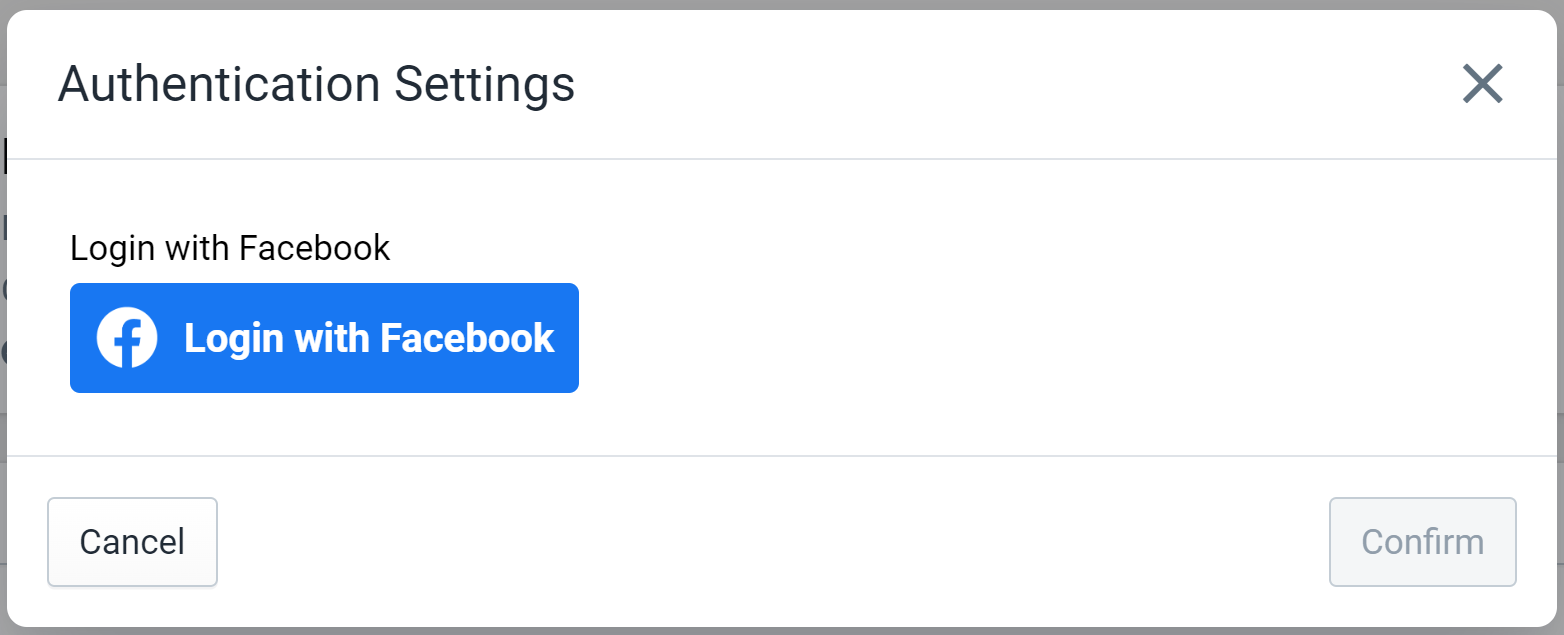
Figure 1: Authentication Popup
Click "Grant access" to be taken to your Facebook account where you can confirm the connection between Fanplayr and Facebook. Fanplayr 360 uses Facebook Login for Business which is typically how Tech Providers like Fanplayr integrate with Facebook. Make sure to select the correct business and ad account when prompted during the login process. Confirming the connection will complete the OAuth2 connection and bring you back to the Destination editor.
Click "Confirm" to finalize the authentication process.
Capabilities
Sync user with a Facebook Custom Audience
The only capability available for the Facebook Custom Audience integration is Audience syncing. When linked to a Fanplayr 360 Audience, our system will edit your selected Facebook Custom Audience by adding or removing users to match the Fanplayr Audience. The synchronization schedule follows the evaluation settings of the Fanplayr 360 Audience, but it may take longer for Facebook to recognize the changes to the Facebook Custom Audience.
The setup for this capability is simple and involves selecting your desired Facebook Custom Audience in the "Custom Audience" dropdown in the Destination editor. The list of Custom Audiences in the dropdown include Audiences from all of the Facebook Ad Accounts that were approved for Fanplayr use during the authentication process. The name of the corresponding Ad Account appears under the Audience name in the dropdown.
By default, Fanplayr only synchronizes the email addresses of your users with Facebook, but you can customize this to include phone numbers by clicking "Add Output" in the "Outputs" section of the Destination editor.
Note that changes to your Facebook audiences could take some time. Below is a quote from the following documentation: https://developers.facebook.com/docs/marketing-api/audiences/guides/custom-audiences/
Changes to your Custom Audiences don't happen immediately and usually take up to 24 hours. The number of records you request to remove and/or the number of Custom Audiences your account contains will increase the amount of time it takes to process this request.
INFO
Due to the nature of the synchronization, Fanplayr can only sync users that have an email address defined in Fanplayr 360.
More Info
Creating Audience in Facebook Ads Manager
There are two ways to create an audience to sync to in Facebook Ads Manager:
Create from Fanplayr 360 Destination (Recommended)
Fanplayr 360 offers you the ability to create a Facebook Custom Audience directly in our destination editor.
When editing a Facebook Custom Audience destination, there is a dropdown to select which audience to which to synchronize. On the right side of this dropdown, there is a button labeled "Create for me". Clicking this will bring up the popup in Figure 2.

Figure 2: Fanplayr 360 Create Audience
The first field entered is the name of the new custom audience. This will be the name that appears in your Facebook Ads Manager corresponding to this new audience.
Lastly, you must select which Facebook Ad Account to place the newly created audience. The dropdown will consist of every ad account that Fanplayr 360 has access to given the authentication settings.
After filling out the fields and clicking "Create", Fanplayr 360 will create the Facebook Custom Audience in your Facebook Ads Manager account and automatically select the newly created audience in the destination editor's "Custom Audience" field.
INFO
There is a chance that this results in an error if you have not fully accepted Facebook's Custom Audience TOS. For Fanplayr 360 to be able to successfully create an Audience in your account, this TOS must be accepted.
Create directly in Facebook Ads Manager
The Fanplayr 360 Facebook Custom Audience destination requires that a custom audience exists in Facebook Ad Manager prior to starting the sync process. This section will act as a guide to create a custom audience in Facebook's system with their UI.
Figure 3: Facebook Create Audience
First, navigate to the "Audiences" section of the Facebook Ads Manager at https://adsmanager.facebook.com/adsmanager/audiences and click the "Create audience" + "Custom Audience" buttons in the top-left side of the page. Select "Customer list" in the next section near the top-right side. This will bring up a pop-up with six steps to complete.
- Prepare list - Click "Next"
- Select list type - Select "No" and Click "Next". Fanplayr does not use customer values.
- Add customer list - Select "Paste comma-separated values" and paste the below CSV into the text field. Then, enter whatever audience name you would like.
email,phone
example@example.com,18005555555- Match columns - Click "Import & create"
- Upload - Wait until the initialization is complete.
- Confirmation - Click "Done"
At this point, the audience is created and can be used by Fanplayr 360 in the Facebook Custom Audience destination.